Uploading Assets
Create Asset
When creating a new asset in the Asset Manager system, or editing an existing asset, there are four main informational tabs that a user can access:
- Details. This tab contains the metadata fields and values.
- Files. All available files for the selected asset are listed on this tab.
- Related Assets. If the selected asset has been related, or linked, to other assets in the system for reference, they will appear on this tab.
- Folders. This tab displays the current location of the selected asset.
Details
The Details tab of the asset information page contains all available metadata fields for the selected asset. User can add new or edit existing metadata by simply editing text in the available metadata text fields and selecting the Save button.
The Form Type area at the bottom of the Details tab determines which asset Form is used for the selected asset. Forms are chosen when assets are initially created, but can be updated at any time by selecting a new form from the drop-down menu and selecting the Change button. As stated on the page, selecting a new Form for an existing asset will delete any metadata currently associated with the asset.
Files
The Files tab displays all files that are currently associated with the selected asset. Each asset in Asset Manager will have, at a minimum, four basic files:
- Master. The Master file is the original asset file.
- Preview. This is the image that appears when the Enlarge link is selected.
- Thumbnail. The Thumbnail image is shown in the asset listings.
- Mini Thumbnail. This is the image shown when an asset is added to My Workspace and My Basket.
If no file has been uploaded and selected for one of these basic files, the system will automatically assign a generic file icon to the file until one is provided.
In addition to these four basic file types, other files can be added to an asset and given corresponding names, such as Lo Res, High Res, JPG, GIF for PPT, etc. All files added to an asset will be displayed in the Files pop-up menu for an asset. See Processing Rules for more information on creating other file types.
Related Assets*
The Related Assets tab shows users the other assets in the system that the current asset has been related to. This information allows users to quickly view similar and/or related assets in the Asset Manager system.
*Assets can only be related to other assets after they have been saved to the system.
Folders
The Folders tab displays where in the folder hierarchy of the Asset Manager system the current asset resides. When creating a new asset, this tab will display “None” until the asset has been assigned to a folder.
Batch Upload
Getting files in is quick and easy with the batch uploading process - manage a queue of files to process, enter data for files in batches, process file formats quickly, and organize all from one window. Below details the steps required to quick batch upload and process assets.
Start by clicking Batch Upload from the Asset Manager main menu. The Batch Upload window will pop-up. You can choose to work with files waiting in the queue OR to add new files simply click Upload File(s).
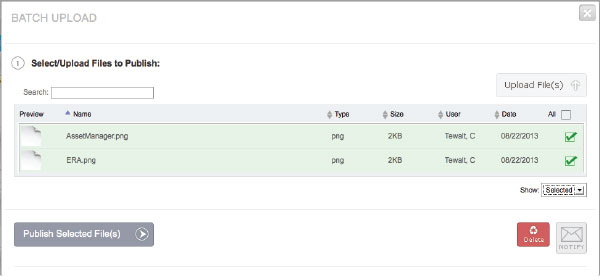
Upload Files - Add files to the queue
Show - selected or all assets in queue
Delete - Removes selected assets from queue
Notify - Sends notification to group
Start by selecting a file(s) from the list OR add file(s) by clicking Upload File(s) button.
*Select only the files that require the processing -form data, folder location, and files to create.
Then click Publish Selected File(s). Window will expand showing step-by-step instructions for completing the process.
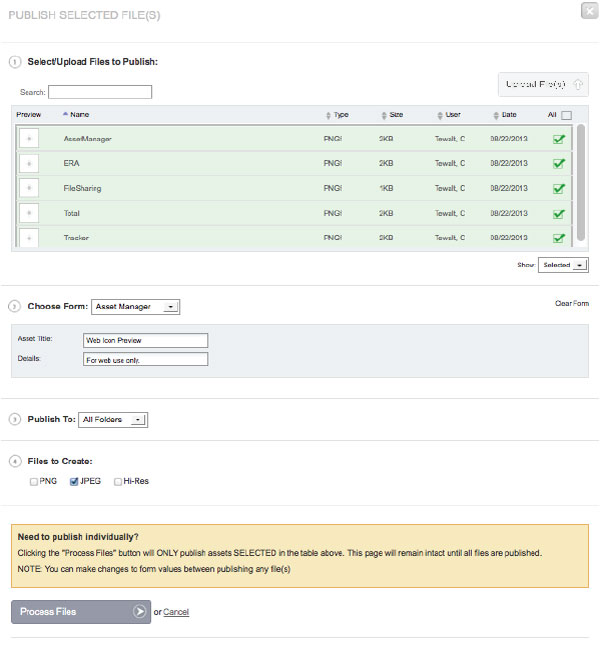
Choose a form. The form chosen will include the files that will be associated
with the selected assets. Any data entered into the fields will be entered for each selected asset.
Next choose the folder or location of selected asset(s).
The folder structure will mirror the folder structure used to organize assets in Asset Manager.
Then select the file formats to create. To finalize the import - Click Process Files to finalize the import.
A Warning will pop-up to verify processing. Click YES to proceed or NO to continue editing.
When Asset(s) have completed processing, you will get a green notification indicating that
assets have successully been published. Continue processing or close the Batch Upload window.
You can continue to process remaining assets with the same form - or clear the form and start a new.