Users
Users are the people that can access your workflow site. Each user logs in with an email address and a password.
Searching for Users
To find users easily, you can search using the controls at the top of the screen.

The search box at the top of the screen will search the user’s profile, trying to find a match (for example, in the name field, the email field, etc).
The dropdown menu allows you to filter by status. By default all users are shown. By picking a different value for this dropdown, you can search for either Active or Inactive users, respectively.
Accessing a User’s Profile
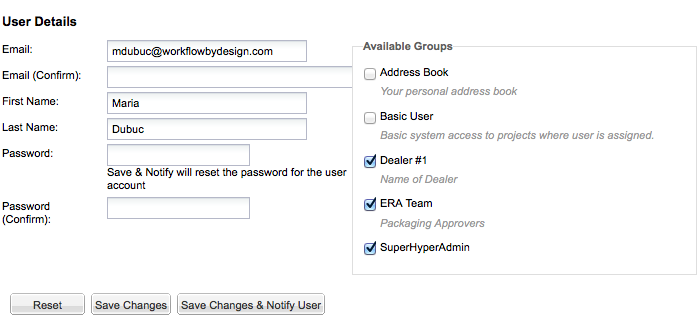
Simply click on the user’s name in the list. The User Details screen will appear.

To modify the user’s profile, simply edit the desired fields, and click Save Changes at the bottom of the screen.
See Passwords for more details.
Editing a User’s Group Memberships
To edit a user’s group memberships, first access the User Details screen. Then simply modify the checkboxes in the Available Groups area on the righthand side of the screen. Finally, click Save Changes at the bottom of the screen.
Deactivating a User
Our systems do not allow you to remove users once you’ve added them. This is for historical purposes.
As an alternative, the system allows you to deactivate a user, which prevents him or her from logging into the site.

To re-activate a user, use the same process, but click Activate instead.
Account Requests: Auto-Activation
If your site generates a lot of account requests, you can opt to approve certain requests automatically.

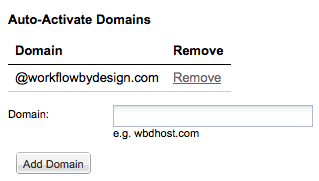
This is handled securely via email domain. You specify an email domain that contains “trusted” users (for example, the email domain for your company). You then set this up as an “Auto-Activate Domain” under the Admin ® Account Requests screen.
Now, when a user from that email domain requests access, it will be granted immediately.
Be sure to setup default ACL rules to cover this situation. For more information, see the section titled “Managing Access Controls”.
Masquerading as Other Users
Masquerading allows you to temporarily assume the identity of another user. This is helpful in various situations, but this power also comes with a certain measure of danger! When masquerading as others, please exercise extreme caution.

There are a variety of use cases for the masquerade function.
- Feature Testing. Our systems are designed to work in a team environment. Using the masquerade feature to assume different user identities allows you to simulate such an environment when testing new features.
- Configuration Testing. When making configuration changes – such as Access Control changes, for example – you will want to test your changes, to avoid disrupting your users’ day-to-day work. Masquerading allows you to do this.
- Support. When a user has an issue, it’s often important to use the masquerade feature to see exactly what he or she is seeing.
- Getting Out of a Jam. Sometimes you just need to be able to do something out of the ordinary. For example, someone is out sick and no one else has privileges to edit his or her jobs. Masquerade to the rescue!
A notice appears at the top of the screen to indicate that you are masquerading. To go back to your normal user profile, click Cancel.

Please note – some users do not have a Masquerade link. These users are “super users” (typically, this is reserved for WBD). No one can masquerade as a super user for security reasons. Administrators may grant the masquerade privilege to anyone in the system. Be very careful with this privilege, and only give it to people whom you absolutely trust. Note that there is a column in the User List called Masquerade that indicates whether or not a user has the masquerade privilege.