Building a Report
The Report Builder page can be found from the Admin tab of the workflow website. Users with necessary privileges (access to the Admin tab) are able to create, edit and delete Reports from the system on this page.
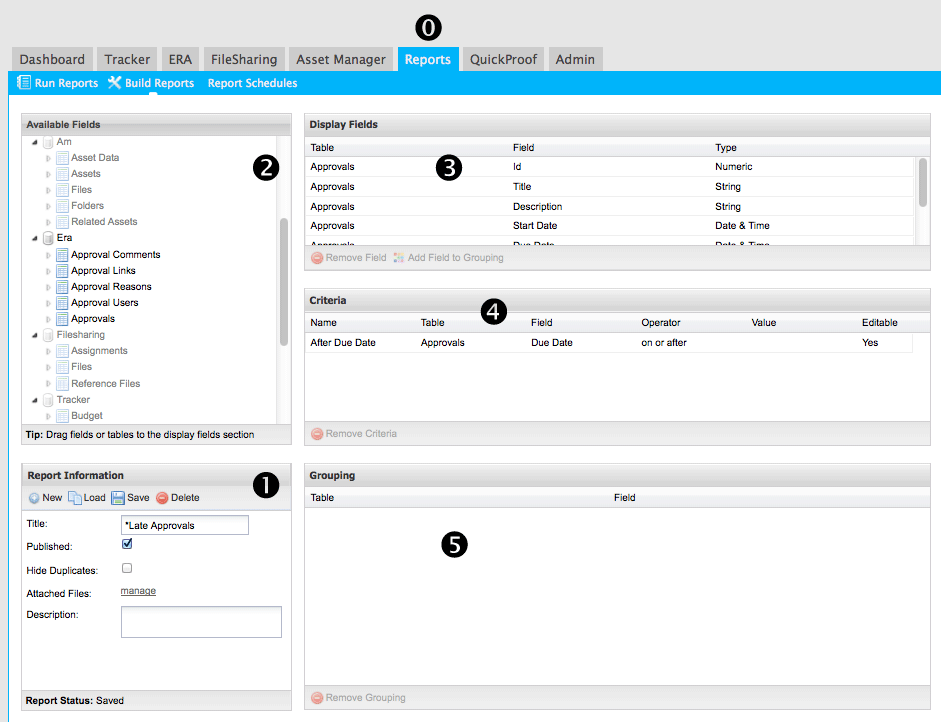
Starting on the Reports Tab - choose Build Reports from menu options.
1. Report Information - The Report Information area allows users to save the current report, load an existing report for edits, or delete a report from the system. It also determines if an existing report will display for users on the Reporting tab. *Use ACL options to show or hide per user/group.
2. Available Fields - Find all the informational fields in each module that can be used/pulled into a Report.
All project tabs that are installed in the Tracker application are listed under the Tracker heading. Expanding these tabs will display the Fields that can be found on each tab.
There are three types of fields listed for the tabs:
- An "A" symbol denotes Text fields.
- A calender icon denotes Date fields.
- A calculator icon denotes Numeric fields.
*Unavailable fields will be greyed out.
3. Display Fields - Drag-and-drop the available fields to the display fields window.
Adding fields to this area is easily accomplished by simply dragging the desired field from the Available Fields area to this Display Fields table.
Any number of fields can be added to the Display Fields table. However, reports are limited to the Project Detail tab, and only one (1) other project tab. For example, if fields are added to the Display Fields table from the Project Detail and Project Teams tabs, users are not able to then include fields from the Project Sched (Milestones) tab.
The table is broken down into three columns:
- Table. This indicates which tab in Project Tracker the field can be found.
- Field. This displays the name of the field.
- Type. Type indicates the field Type (Text/String, Date/Time or Numeric).
4. Criteria - The Criteria table shows the Filters that will be used for the created report. These filters can be created so users that run the reports are able to enter their own search/filter data, or hidden to always filter on specific criteria.
The columns for the Criteria table are as follows:
- Name. This is the field label text that will display to users when the selected filter will be open to user input.
- Table. This indicates which tab in Project Tracker the field can be found.
- Field. This displays the name of the field.
- Operator. This determines how the filter is run against the selected field.
- Value. Value is the criteria used to filter against the selected field.
- Editable. This column indicates if users running the report will be able to edit the selected criteria (Yes), or if the filter data will be hidden from users (No).
5. Grouping - Grouping determines how the final report will sort included data when users run the report. Fields added to the Grouping table must be included in the Display Fields table as well. Multiple fields can be added to the Grouping table, and final reports will be sorted in order starting with the first field in the Grouping list.
Building a Report
In most cases, WBD will provide a pre-built report for customers to serve as an example of how to construct new reports.
To build a new report in the workflow system, follow the instructions below.
Add Display Fields
- From the Available Fields area on the Report Builder page, expand the category that contains the fields necessary for the new report.
- Click on the desired field and drag it over to the Display Fields table. The table will reload and display the newly added field.
- Repeat Step 2 until all desired fields have been added to the Display Fields table.
Add Grouping Fields
- Select a field in the Display Fields area that you wish to use to sort your final report.
- Select the Add Field to Grouping button in the Display Field table. The Grouping table will reload and display the newly added field.
- Repeat Step 2 until all desired fields have been added to the Grouping table.
Determine Search/Filter Criteria
- From the Available Fields area, click on the field that will be used to filter down the search results for your final report.
- Drag the desired field to the Criteria table. The Criteria table will reload and display the newly added field.
- Double-click on “Unnamed Criteria” in the Name column of the Criteria table. This allows you to edit the text that will appear to users on the Reporting tab.
- Double-click the cell under the Operator column and select a Filter option. Information on Filter/Operator types can be found in subsequent sections of this guide.
- Double-click the cell under the Value column to add a value to the selected Filter, if necessary. Leaving the field blank will allow users to enter their own value when the report is run from the Reporting tab (provided the field is marked as Editable in the next step).
- Double-click the cell under the Editable column and select an option (Yes or No). Yes means users will be able to enter their own values for the selected Filter; No indicates that users will not see this filter when they run the report, and the report will always filter using the value entered in the Value column.
- Repeat Steps 1 through 6 until all desired fields have been added to the Criteria table.
Save Report
- In the Report Information area, enter a Title (required) and Description (optional) for your report.
- Select the Published option if you want users to see and have access to run the newly created Report. Leaving this option unchecked will still maintain the report structure in Report Builder, but will not display it to users on the Reporting tab.
- Select the Save button when you have finished to commit your changes to the system.